

At the Great Train Show in Puyallup last weekend, I picked up two small DPM kits for $15 each: Pam’s Pet Shop and Kelly’s Saloon. They’re both fairly small, two-story structures. I immediately started working on building and painting the pet shop kit, which I think I’ll make a cafe or restaurant out of.
As with most situations involving a user manual or instruction sheets, I first read the entire instructions, and then re-read parts of it more than once, to fully understand the manufacturer’s intentions before doing anything. But I modified the assembly procedure slightly, based on tips I’ve read in Model Railroader. For example, the instructions say to assemble and glue the entire model before painting, and it didn’t mention using a primer, but I followed MR’s advice by using a primer made for plastic (Montana Plastic Primer, as recommended by a clerk at my local Blick Art Supplies), and I airbrushed the window frames before gluing them to the walls. As I write this, the windows still aren’t attached (more on that later).
Again following advice from Kalmbach’s Basic Painting & Weathering for Model Railroaders, I painted the exterior walls a base color of Model Master Acrylic Flat Boxcar Red, then created a darker shade by mixing some of that color with a drop of flat black, which I used for the rows of bricks above and below each window frame, and the decorative brick pattern that protrudes slightly off the facade. I then brush-painted a random but fairly evenly-distributed selection of bricks in three different colors that just stand out slightly from the base coat. I think I will apply one or two additional colors to more bricks before applying powdered artist chalks in the mortar grooves.
After I’ve applied chalk for the mortar, I’ll attach the window frames, then add some weathering effects with more paint and chalk before sealing the whole thing off with Testor’s Dullcote. One regret I have is gluing the window glazing to the frames already. I did it mostly so that I didn’t have so many loose pieces, but now I realize that when I apply the Dullcote, it’ll cover the glazing as well, which I imagine will make the windows look cloudy. If necessary, I can remove the glazing and re-apply new glazing, since the kit came with more than enough to do the whole building twice. Or I can try to cover the glazing with little pieces of card stock while spraying. Fortunately, I haven’t yet applied glazing to the large windows and door on the front, so at least those will be spared from the Dullcote.
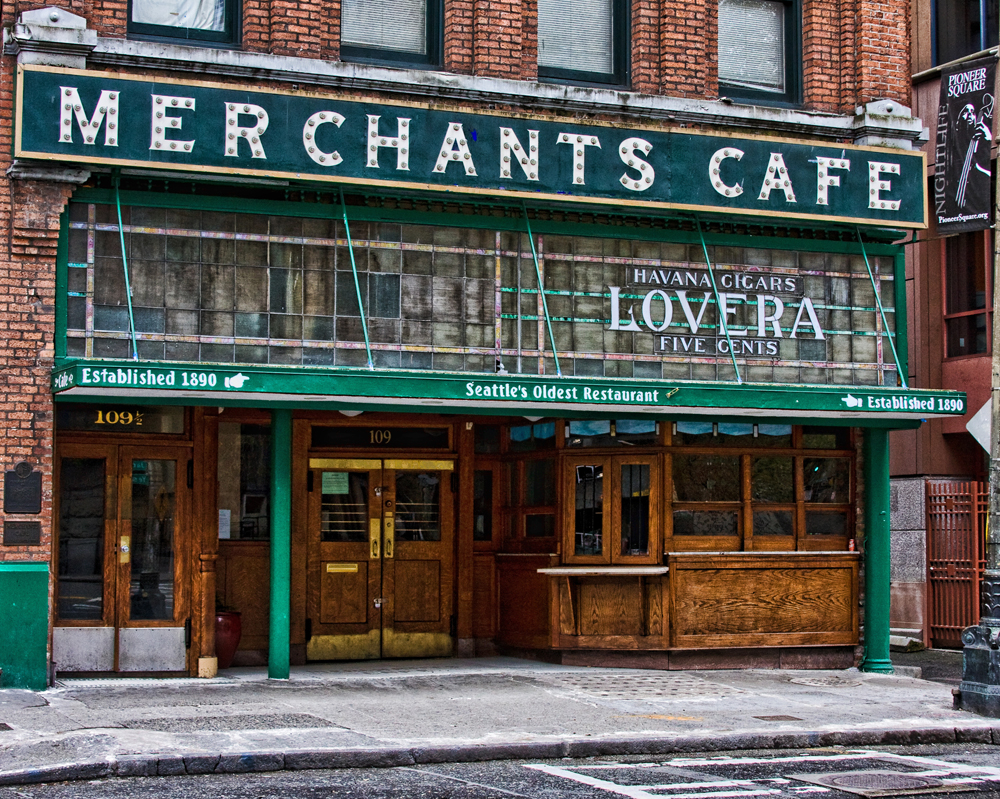
In addition to LED illumination and interior details, one thing I’d really like to try on this structure is to make a sign similar in style to the one on Merchants Cafe in Seattle, as shown above. Its white letters are studded with steady-burning white lights, which I’d like to model with fiber optics. But with that many fiber optic filaments going into the back of the sign from inside the building, I probably won’t be able to do much interior detail on the second floor. I’ll probably have to put in some blinds that are pulled down, on the front windows.
After sharing a progress photo in the Facebook group, HO Scale Model Railroading, I learned from someone’s comments that my smallest brush (000) is not the smallest type available. It was the smallest I saw at Blick, but I learned that they get even smaller, such as 10/0, 20/0, and a less common 30/0. I’m assuming the “10/” means ten zeros, since I’ve also seen 000 and 0000 referred to as 3/0 and 4/0. I ordered some 10/0 and 20/0 sable brushes from Amazon. I hope it’s small enough to help me neatly paint the tiny vertical grooves molded into the building’s “wood” facade. Now I just have to decide what color to use there. My first thought was white, but now I’m thinking I should try just a darker or lighter shade of the existing green.
The last time I built or painted any type of model was probably about 30 years ago, and my skills weren’t great. I didn’t have most of the proper tools or supplies. But in the decades since I last built and painted models, I’ve read a lot of material in Model Railroader magazine and their various other publications, with a particular interest in painting and weathering techniques. It appears to have rubbed off on me, as my skills are noticeably better than the last time I did any of this. That has be even more excited about creating a stockpile of weathered structures, rolling stock, custom-painted figures, functional scratch-built signals and more, so that when I have enough space to build a model railroad in the future, I’ll be ready.